anythingllm
openclaw
安装依赖
OpenClaw 要求 Node.js 版本 >= 22,我们使用 nvm(Node Version Manager)来安装和管理 Node.js 版本。
安装node和npm
curl -so- https://raw.githubusercontent.com/nvm-sh/nvm/v0.40.4/install.sh | bash
source ~/.bashrc
nvm install 25
验证安装成功:
node -v
npm -v
安装openclaw
curl -fsSL https://openclaw.ai/install.sh | bash
配置 openclaw
(1)接受风险
OpenClaw 非常强大,可以直接接管你的服务器(包括执行终端命令、读写文件、安装软件等),使用前需要明确接受这一风险。
🦞 OpenClaw 2026.3.11 (29dc654) — If it works, it's automation; if it breaks, it's a "learning opportunity."

09:26:57 [plugins] plugins.allow is empty; discovered non-bundled plugins may auto-load: qqbot (/root/.openclaw/extensions/qqbot/index.ts). Set plugins.allow to explicit trusted ids.
09:26:57 [plugins] qqbot: loaded without install/load-path provenance; treat as untracked local code and pin trust via plugins.allow or install records (/root/.openclaw/extensions/qqbot/index.ts)
▄▄▄▄▄▄▄▄▄▄▄▄▄▄▄▄▄▄▄▄▄▄▄▄▄▄▄▄▄▄▄▄▄▄▄▄▄▄▄▄▄▄▄▄▄▄▄▄▄▄▄▄
██░▄▄▄░██░▄▄░██░▄▄▄██░▀██░██░▄▄▀██░████░▄▄▀██░███░██
██░███░██░▀▀░██░▄▄▄██░█░█░██░█████░████░▀▀░██░█░█░██
██░▀▀▀░██░█████░▀▀▀██░██▄░██░▀▀▄██░▀▀░█░██░██▄▀▄▀▄██
▀▀▀▀▀▀▀▀▀▀▀▀▀▀▀▀▀▀▀▀▀▀▀▀▀▀▀▀▀▀▀▀▀▀▀▀▀▀▀▀▀▀▀▀▀▀▀▀▀▀▀▀
                  🦞 OPENCLAW 🦞

┌  OpenClaw onboarding
│
◇  Security ─────────────────────────────────────────────────────────────────────────────────╮
│                                                                                            │
│  Security warning — please read.                                                           │
│                                                                                            │
│  OpenClaw is a hobby project and still in beta. Expect sharp edges.                        │
│  By default, OpenClaw is a personal agent: one trusted operator boundary.                  │
│  This bot can read files and run actions if tools are enabled.                             │
│  A bad prompt can trick it into doing unsafe things.                                       │
│                                                                                            │
│  OpenClaw is not a hostile multi-tenant boundary by default.                               │
│  If multiple users can message one tool-enabled agent, they share that delegated tool      │
│  authority.                                                                                │
│                                                                                            │
│  If you’re not comfortable with security hardening and access control, don’t run           │
│  OpenClaw.                                                                                 │
│  Ask someone experienced to help before enabling tools or exposing it to the internet.     │
│                                                                                            │
│  Recommended baseline:                                                                     │
│  - Pairing/allowlists + mention gating.                                                    │
│  - Multi-user/shared inbox: split trust boundaries (separate gateway/credentials, ideally  │
│    separate OS users/hosts).                                                               │
│  - Sandbox + least-privilege tools.                                                        │
│  - Shared inboxes: isolate DM sessions (`session.dmScope: per-channel-peer`) and keep      │
│    tool access minimal.                                                                    │
│  - Keep secrets out of the agent’s reachable filesystem.                                   │
│  - Use the strongest available model for any bot with tools or untrusted inboxes.          │
│                                                                                            │
│  Run regularly:                                                                            │
│  openclaw security audit --deep                                                            │
│  openclaw security audit --fix                                                             │
│                                                                                            │
│  Must read: https://docs.openclaw.ai/gateway/security                                      │
│                                                                                            │
├────────────────────────────────────────────────────────────────────────────────────────────╯
│
◆  I understand this is personal-by-default and shared/multi-user use requires lock-down. Continue?
│  ○ Yes / ● No
(2) 选择引导方式
我们选择
QuickStart方式
│
◆  Onboarding mode
│  ● QuickStart (Configure details later via openclaw configure.)
│  ○ Manual
└
(3) 选择模型
模型是 OpenClaw 的
大脑,选择合适的模型非常重要。可以根据需要选择模型,这里我选择了阿里云百炼Qwen
(4) 选择通道 Channel
渠道是你与 OpenClaw 交互的”入口”。你可以通过不同的渠道给 OpenClaw 发消息、接收回复,就像给它装上了不同的”沟通方式”。这里我选择 QQ
在 QQ 开放平台:https://q.qq.com/,创建 QQ 机器人,在QQ机器人管理页面获取当前机器人的AppID和AppSecret
AppID和AppSecret是机器人的核心凭证,请妥善保管,切勿泄露到公开仓库或分享给他人。
在服务器安装 QQBot 插件:
openclaw plugins install @sliverp/qqbot@latest
将前面获取的AppID和AppSecret配置到OpenClaw中:可直接修改配置文件 ~/.openclaw/openclaw.json,手动添加以下配置:
 {
   "channels": {
     "qqbot": {
       "enabled": true,
       "appId": "你的AppID",
       "clientSecret": "你的AppSecret"
     }
   }
 }
配置修改后,需要重启Gateway使配置生效.
pm2 stop "openclaw"
pm2 start "openclaw gateway"
在QQ中找到你创建的机器人,发送一条消息进行测试。如果机器人能正常回复,说明QQ渠道接入成功.
(5) 选择技能 skill
技能是 OpenClaw 的”能力插件”,让它从一个只会聊天的机器人,变成一个能干实事的智能助手。每个技能本质上就是一个文件夹,核心是一个 SKILL.md 文件,AI 通过阅读它来理解这个技能是干什么的、什么时候该用它。
目前 ClawHub(技能市场)上已有 1w+ 技能,每天都在快速增长中,覆盖办公自动化、开发工具、智能家居、社交媒体等各种场景
命令行安装方式:
# 安装 ClawHub CLI(仅需执行1次)
npm i -g clawhub

# 搜索技能
clawhub search [关键词]

# 安装技能(支持单个或批量安装)
clawhub install [Skill slug]
clawhub install [Skill slug] --version <version>
clawhub install [Skill slug1] [Skill slug2] [Skill slug3]

# 升级技能
clawhub update [Skill slug]
clawhub update --all

# 卸载技能
clawhub uninstall [Skill slug]
提示词安装方式:
最简单的方式!直接在 OpenClaw 对话窗口中说:帮我查找XXX技能 或 帮我安装XXX技能,它会自行运行指令搞定,全程不用碰终端。这得益于 clawhub CLI 安装时,会默认安装一个管理技能的内置技能
例子:
以安装 nano-pdf(PDF处理技能)为例:
# 安装技能
root@RUAN:~ clawhub install nano-pdf
✔ OK. Installed nano-pdf -> /root/.openclaw/workspace/skills/nano-pdf

# 查看已安装技能
root@RUAN:~ clawhub list
nano-pdf  1.0.0
(6) 选择Hooks
Hooks 是OpenClaw的消息钩子机制,可以在消息收发的各个环节插入自定义处理逻辑。
(7) 等待完成
请记录输出中带token的
URL,后面登录OpenClaw控制台需要
等待安装结束,直到终端输出:Onboarding complete. Use the dashboard link above to control OpenClaw.
网关问题
(1) 网关异常
虽然OpenClaw的引导安装已结束,但此时网关可能存在异常,无法正常使用。建议使用pm2进行管理,方便省事
npm install -g pm2
pm2 start "openclaw gateway"
pm2 save
pm2 list
登录控制台
在本地浏览器中打开前面记录的带token的URL(形如 http://127.0.0.1:18789/?token=xxx),即可登录OpenClaw控制台。
在对话窗口随便输入一些内容,如果OpenClaw能正常响应,说明大模型配置已经成功
添加新模型
脱离共享通道,使用自己的配额。
步骤1:获取阿里云API Key
- 访问 阿里云DashScope控制台
- 开通模型服务,创建新的API Key (新用户通常有免费额度(约100万Token))
步骤2:配置OpenClaw
找到OpenClaw的配置文件(通常位于~/.openclaw/openclaw.json),在models.providers中添加阿里云配置:
"models": {
  "providers": {
    "bailian": {
      "baseUrl": "https://dashscope.aliyuncs.com/compatible-mode/v1",
      "apiKey": "你的API-KEY",
      "api": "openai-completions",
      "models": [
        {
          "id": "qwen-plus",
          "name": "Qwen3 Plus",
          "reasoning": false,
          "contextWindow": 128000,
          "maxTokens": 8192
        },
        {
          "id": "qwen-max",
          "name": "Qwen3 Max",
          "reasoning": false,
          "contextWindow": 128000,
          "maxTokens": 8192
        },
        {
          "id": "qwen-turbo",
          "name": "Qwen3 Turbo",
          "reasoning": false,
          "contextWindow": 128000,
          "maxTokens": 8192
        }
      ]
    }
  }
}
步骤3:切换默认模型
在agents.defaults.model中将primary改为:
"primary": "bailian/qwen-plus"
步骤4:重启OpenClaw网关
pm2 restart "openclaw gateway"
查询/切换模型
通过 session_status 查询实时验证
通过 channel 切换模型 (临时切换) :
/model qwen-portal/coder-model
请帮我检查 manuscript_draft_v2.md 中的 LaTeX 引用格式是否符合 Elsevier 要求
✅ 效果:仅本次请求使用新模型,后续消息自动回归默认;
✅ 安全:无需重启,无副作用;
✅ 可验证:执行后立即返回 session_status 显示新模型。
通过 channel 切换模型 (持久默认) :
openclaw config set model.default qwen-portal/coder-model
✅ 效果:所有新会话默认使用该模型;
⚠️ 注意:需管理员权限,且影响全局;建议先用方式1测试。
channel问题
常用 channel QQ_bot 和 telegram, qqbot 简单易用,但功能简单,不能分组。因此在用过 qqbot 一周之后果断转到 telegram.
channels 代码片段:
    "telegram": {
      "enabled": true,
      "botToken": "输入你的token",
      "dmPolicy": "pairing",
      "groups": {
        "-输入你的groupID": {
          "requireMention": true
        }
      }
    }
- 你的
botToken: 在BotFather创建 bot 的时候会给出。通过/newbot创建新bot,然后会提示输入新bot的显示名字如 t460bot,接着给出新bot的username这个是新bot真正@的时候使用的名字,比如lxylpt460bot,那么在使用的时候是通过@lxylpt460bot来召唤这个新bot的。通过/mybots可以查看我们所拥有的 bots。 - 你的
groupID:
- 首先新建 screen, 通过代理启动gateway:
ALL_PROXY=socks5://127.0.0.1:7891 openclaw gateway - 新建
group, 在group中新建topic。将我们的bot添加到group中,实现课题分类。
针对在 lxylpGroup 中 @mybot 得不到回复,最可能的原因是 Bot 的隐私模式仍处于启用状态,且未被添加为群组管理员。
- 配置机器人:关闭隐私模式并设为管理员
这是解决问题的关键一步。你需要同时完成以下两个操作:
关闭隐私模式:
- 在 Telegram 中找到
@BotFather。 - 发送
/setprivacy命令。 - 在弹出的列表中选择你的机器人
mybot。 - 选择
Disable来关闭隐私模式 。 - 重要:更改此设置后,必须将机器人从群组中踢出并重新邀请,更改才能生效 。
- 在 Telegram 中找到
设为群组管理员:
- 在你所在的
lxylpGroup群组中,点开机器人mybot的个人资料页。 - 点击“管理”或“设为管理员”选项。
- 授予其管理员权限。即使不给其他敏感权限,拥有管理员身份也能保证它可以阅读所有消息。
- 在你所在的
- 检查并修正 OpenClaw 配置
确认你的 ~/.openclaw/openclaw.json 配置文件正确。
获取正确的群组 ID:确保配置文件中的群组 ID 是正确的。你可以将机器人添加到群组后,在服务器端运行
openclaw logs --follow查看日志中chat.id字段来获取真实的群组ID,然后在群里发条消息,日志中会显示chat.id。验证
requireMention配置:群组配置中的requireMention字段通常应为true,表示机器人只响应被@的消息。你的配置文件应该类似这样:
- 重启
OpenClaw并验证。完成以上配置后,重启OpenClaw服务
常用运维命令
# 查看 OpenClaw 运行状态
openclaw status

# 查看网关状态
pm2 list
openclaw gateway status

# 重启网关(修改渠道配置后需要执行)
pm2 start "openclaw gateway"
openclaw gateway restart

# 重新进入配置引导
openclaw configure

# 查看已安装的插件
openclaw plugins list

# 查看已安装的技能
clawhub list

# 查看日志(排查问题时使用)
openclaw logs
模型管理 openclaw config
root@t460p:~# openclaw config

🦞 OpenClaw 2026.3.11 (29dc654) — Your .env is showing; don't worry, I'll pretend I didn't see it.

▄▄▄▄▄▄▄▄▄▄▄▄▄▄▄▄▄▄▄▄▄▄▄▄▄▄▄▄▄▄▄▄▄▄▄▄▄▄▄▄▄▄▄▄▄▄▄▄▄▄▄▄
██░▄▄▄░██░▄▄░██░▄▄▄██░▀██░██░▄▄▀██░████░▄▄▀██░███░██
██░███░██░▀▀░██░▄▄▄██░█░█░██░█████░████░▀▀░██░█░█░██
██░▀▀▀░██░█████░▀▀▀██░██▄░██░▀▀▄██░▀▀░█░██░██▄▀▄▀▄██
▀▀▀▀▀▀▀▀▀▀▀▀▀▀▀▀▀▀▀▀▀▀▀▀▀▀▀▀▀▀▀▀▀▀▀▀▀▀▀▀▀▀▀▀▀▀▀▀▀▀▀▀
                  🦞 OPENCLAW 🦞

┌  OpenClaw configure
│
◇  Existing config detected ─────────╮
│                                    │
│  workspace: ~/.openclaw/workspace  │
│  model: qwen-portal/coder-model    │
│  gateway.mode: local               │
│  gateway.port: 18789               │
│  gateway.bind: loopback            │
│                                    │
├────────────────────────────────────╯
│
◆  Where will the Gateway run?
│  ● Local (this machine) (Gateway reachable (ws://127.0.0.1:18789))
│  ○ Remote (info-only)
管理面板
root@t460p:~# openclaw onboard

🦞 OpenClaw 2026.3.11 (29dc654) — If it works, it's automation; if it breaks, it's a "learning opportunity."

09:26:57 [plugins] plugins.allow is empty; discovered non-bundled plugins may auto-load: qqbot (/root/.openclaw/extensions/qqbot/index.ts). Set plugins.allow to explicit trusted ids.
09:26:57 [plugins] qqbot: loaded without install/load-path provenance; treat as untracked local code and pin trust via plugins.allow or install records (/root/.openclaw/extensions/qqbot/index.ts)
▄▄▄▄▄▄▄▄▄▄▄▄▄▄▄▄▄▄▄▄▄▄▄▄▄▄▄▄▄▄▄▄▄▄▄▄▄▄▄▄▄▄▄▄▄▄▄▄▄▄▄▄
██░▄▄▄░██░▄▄░██░▄▄▄██░▀██░██░▄▄▀██░████░▄▄▀██░███░██
██░███░██░▀▀░██░▄▄▄██░█░█░██░█████░████░▀▀░██░█░█░██
██░▀▀▀░██░█████░▀▀▀██░██▄░██░▀▀▄██░▀▀░█░██░██▄▀▄▀▄██
▀▀▀▀▀▀▀▀▀▀▀▀▀▀▀▀▀▀▀▀▀▀▀▀▀▀▀▀▀▀▀▀▀▀▀▀▀▀▀▀▀▀▀▀▀▀▀▀▀▀▀▀
                  🦞 OPENCLAW 🦞

┌  OpenClaw onboarding
│
◇  Security ─────────────────────────────────────────────────────────────────────────────────╮
│                                                                                            │
│  Security warning — please read.                                                           │
│                                                                                            │
│  OpenClaw is a hobby project and still in beta. Expect sharp edges.                        │
│  By default, OpenClaw is a personal agent: one trusted operator boundary.                  │
│  This bot can read files and run actions if tools are enabled.                             │
│  A bad prompt can trick it into doing unsafe things.                                       │
│                                                                                            │
│  OpenClaw is not a hostile multi-tenant boundary by default.                               │
│  If multiple users can message one tool-enabled agent, they share that delegated tool      │
│  authority.                                                                                │
│                                                                                            │
│  If you’re not comfortable with security hardening and access control, don’t run           │
│  OpenClaw.                                                                                 │
│  Ask someone experienced to help before enabling tools or exposing it to the internet.     │
│                                                                                            │
│  Recommended baseline:                                                                     │
│  - Pairing/allowlists + mention gating.                                                    │
│  - Multi-user/shared inbox: split trust boundaries (separate gateway/credentials, ideally  │
│    separate OS users/hosts).                                                               │
│  - Sandbox + least-privilege tools.                                                        │
│  - Shared inboxes: isolate DM sessions (`session.dmScope: per-channel-peer`) and keep      │
│    tool access minimal.                                                                    │
│  - Keep secrets out of the agent’s reachable filesystem.                                   │
│  - Use the strongest available model for any bot with tools or untrusted inboxes.          │
│                                                                                            │
│  Run regularly:                                                                            │
│  openclaw security audit --deep                                                            │
│  openclaw security audit --fix                                                             │
│                                                                                            │
│  Must read: https://docs.openclaw.ai/gateway/security                                      │
│                                                                                            │
├────────────────────────────────────────────────────────────────────────────────────────────╯
│
◆  I understand this is personal-by-default and shared/multi-user use requires lock-down. Continue?
│  ○ Yes / ● No
参考来源
传统LLM应用的弊端
自OpenAI革命性的ChatGPT发布以来,在人工智能领域,特别是大型语言模型(Large Language Model,LLM)的能力进化速度之快令人惊叹,大模型浪潮已经席卷了几乎各行业。通过利用LLM的强大功能来解决复杂任务、增强自然语言理解和生成类人文本,从而可能颠覆各个领域。
但是当涉及到专业场景或行业细分领域时,通用的基础大模型基本无法满足我们的实际业务需求,主要有以下几方面原因:
- 知识的局限性:模型自身的知识完源于它的训练数据,而现有的主流大模型(ChatGPT、文心一言、通义千问)的训练集基本都是构建于网络公开的数据,对于一些实时性的、非公开的或离线的数据是无法获取到的,这部分知识也就无从具备。
- 幻觉问题:所有的AI模型的底层原理都是基于数学概率,其模型输出实质上是一系列数值运算,大模型也不例外,所以它有时候会一本正经地胡说八道,尤其是在大模型自身不具备某一方面的知识或不擅长的场景。而这种幻觉问题的区分是比较困难的,因为它要求使用者自身具备相应领域的知识。
- 数据安全性:对于企业来说,数据安全至关重要,没有企业愿意承担数据泄露的风险,将自身的私域数据上传第三方平台进行训练。这也导致完全依赖通用大模型自身能力的应用方案不得不在数据安全和效果方面进行取舍。既要保证安全,又要借助AI能力,那么最好的方式就是把数据全部放在本地,企业数据的业务计算全部在本地完成。
除此之外,还有许多其他问题:包括tokens的限制,虽然这个长期来看不是问题,各LLM供应商的tokens数量限制肯定会越来越大。但是,费用也许就是另外一个需要考虑的问题了。
检索增强生的优势
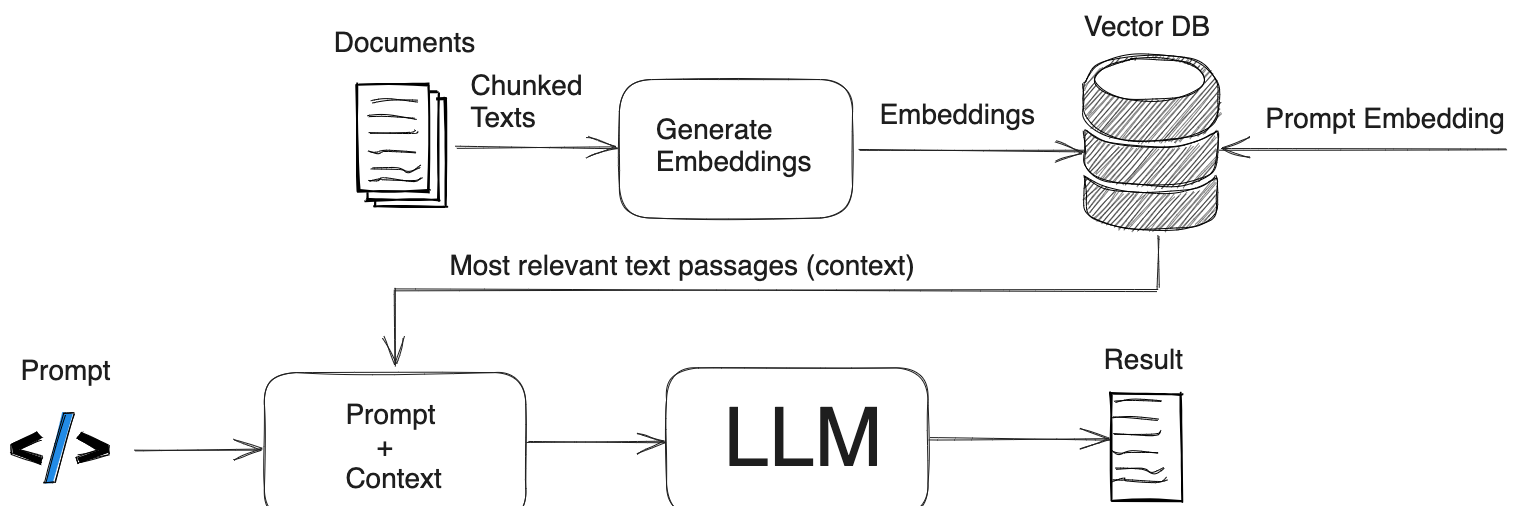
检索增强生成(Retrieval-Augmented Generation,RAG),是一种使用外部知识库来补充大语言模型的上下文并生成响应的技术。 RAG结合了LLM中的参数化知识和非参数化外部知识,缓解了幻觉问题,通过检索技术识别及时的信息,并增强了响应的准确性。 此外,通过引用来源,RAG增加了模型输出的透明度和用户信任度。 RAG还可以通过索引相关文本语料库进行定制以适应特定领域。
RAG的架构如图所示,简单来讲,RAG就是通过检索获取相关的知识并将其融入Prompt,让大模型能够参考相应的知识从而给出合理回答。因此,可以将RAG的核心理解为“检索+生成”,前者主要是利用向量数据库的高效存储和检索能力,召回目标知识;后者则是利用大模型和Prompt工程,将召回的知识合理利用,生成目标答案。
完整的RAG应用流程主要包含数据准备和应用两个阶段。
数据准备主要是将私域数据向量化后构建索引并存入数据库的过程。主要包括:数据提取、文本分割、向量化、数据入库等环节。文本分割主要考虑两个因素:1)embedding模型的Tokens限制情况;2)语义完整性对整体的检索效果的影响。向量化是一个将文本数据转化为向量矩阵的过程,该过程会直接影响到后续检索的效果。数据向量化后构建索引,并写入数据库的过程可以概述为数据入库过程。
应用阶段根据用户的提问,通过高效的检索方法,召回与提问最相关的知识,并融入Prompt;大模型参考当前提问和相关知识,生成相应的答案。
我们可以化繁为简。把RAG——Retrieval Augmented Generation理解为Retrieval And Generation,也就是检索与生成,在加上一个数据向量和索引的工作,我们对RAG就可以总概方式地理解为“索引、检索和生成”。
可以看到,RAG与LLM相结合,成为现阶段自动构建私有/本地知识库的主要手段。
构建本地知识库有三个方面,一是LLM,懂得怎么处理自然语言;二是嵌入模型,它的工作就是把复杂的数据简化,转化成易于处理的格式;最后是向量数据库,专门存储和管理那些转化后的数据。
ollama 安装
Ollama 是一个专注于本地运行大型语言模型(LLM)的框架,它使得用户能够在自己的计算机上轻松地部署和使用大型语言模型,而无需依赖昂贵的GPU资源。Ollama 提供了一系列的工具和服务,旨在简化大型语言模型的安装、配置和使用过程,让更多人能够体验到人工智能的强大能力。Ollama的下载和安装可以参考我之前写的另一篇文章[点击这里](http://blog.lxylp.com:8002/2025/02/04/deepseek/),这里不再赘述。
用户级别
- 下载安装包,centos7.9 选择0.5.12, https://github.com/ollama/ollama/releases
- 解压,并拷贝
bin/ollama到~/bin/, 将~/bin/添加到PATH - 启动 ollama 并让 ollama 监听所有端口
export OLLAMA_HOST="0.0.0.0:11434"
nohup ollama serve > ~/ollama.log 2>&1 &
让服务在退出 SSH 后继续运行
# 停止服务的别名
alias ollama-stop='pkill ollama'
# 启动服务的别名(先停止再启动)
alias ollama-start='pkill ollama; export OLLAMA_HOST=0.0.0.0:11434; nohup ollama serve > ~/ollama.log 2>&1 &'
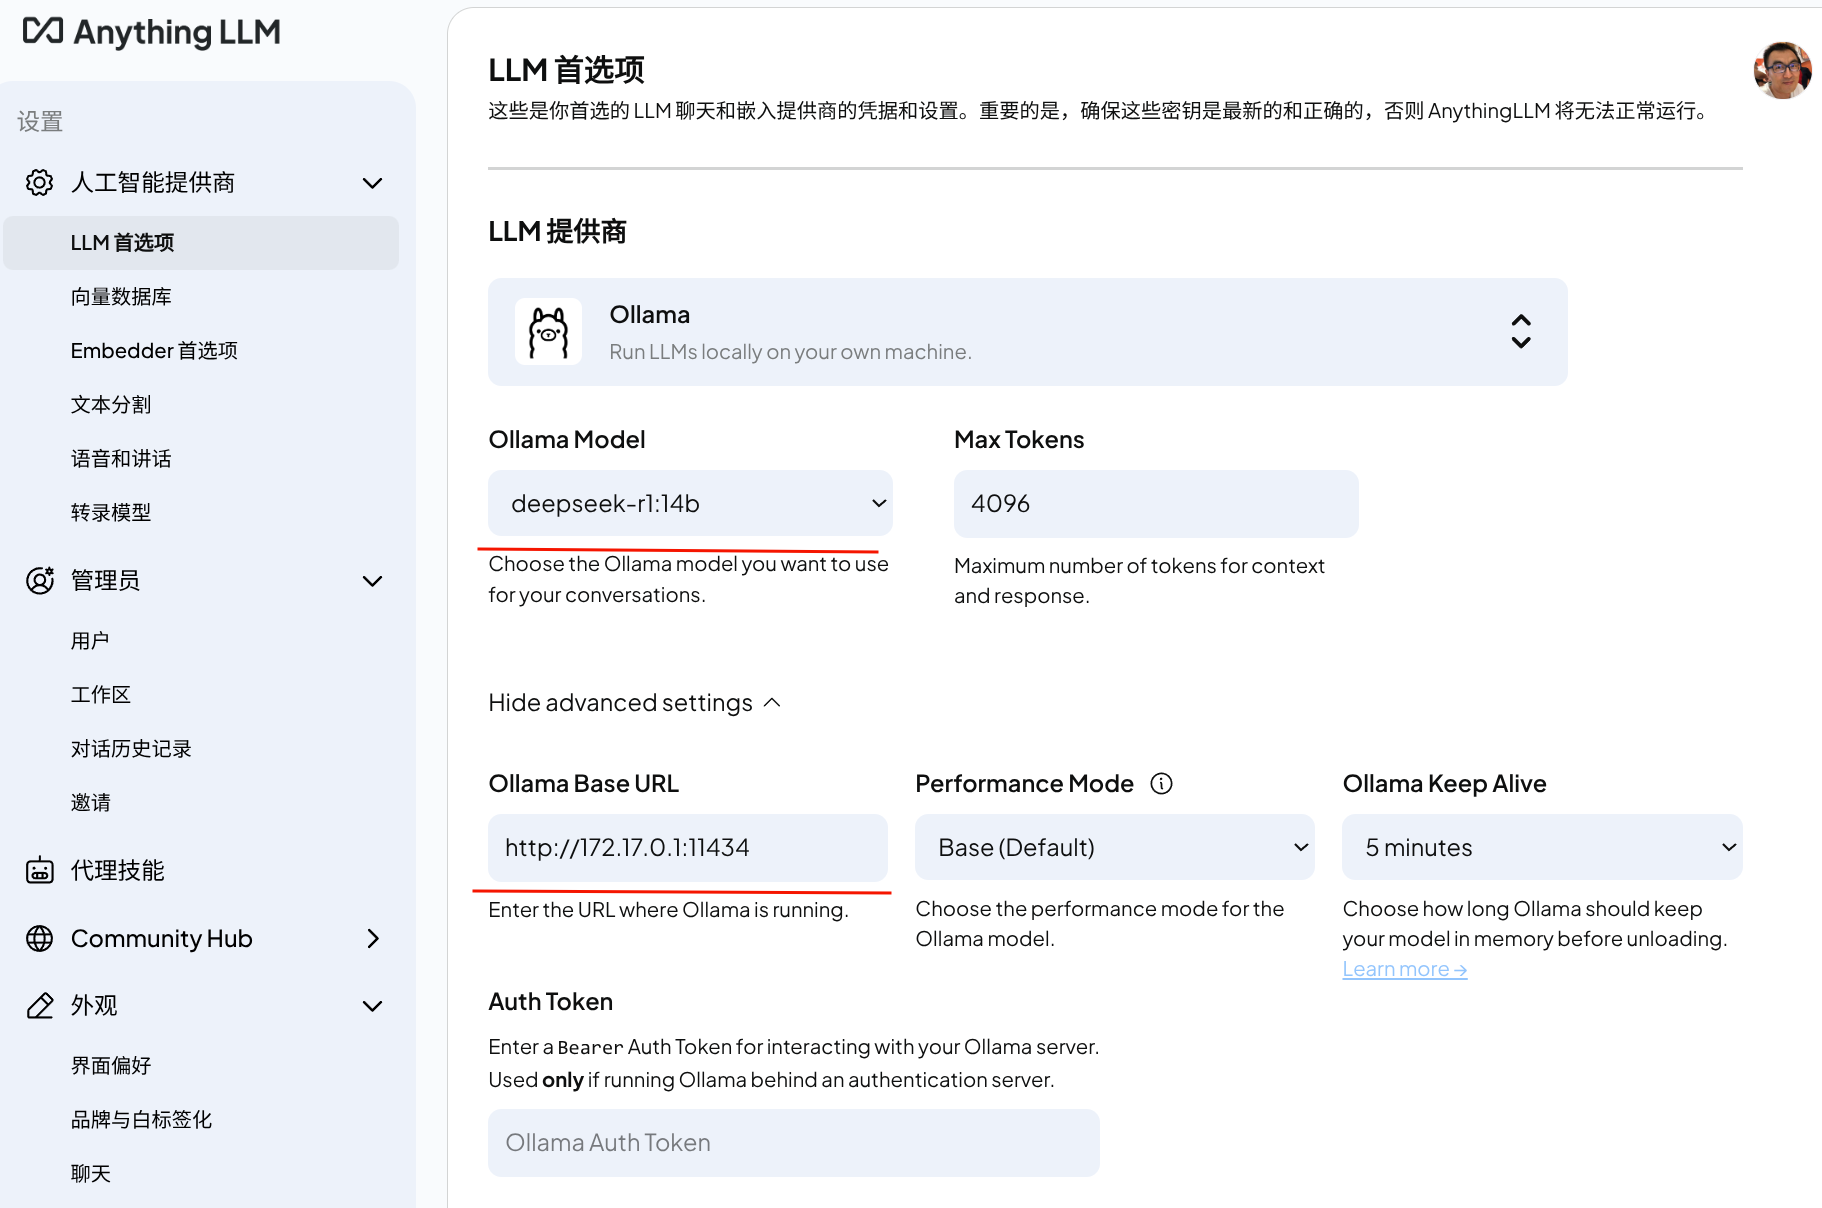
API 连接
不论你用什么工具,要连接你的 Ollama,都需要在工具里正确填写 API 地址。它遵循一个通用的格式:http://<Node1的IP地址>:11434。
假设 Node1 在局域网内的 IP 是 192.168.1.100,那么你的 API 地址就是 http://192.168.1.100:11434。
推荐模型:
在 CentOS 7 系统里,使用 ollama pull 命令拉取的模型,默认会保存在你个人目录下的隐藏文件夹中,路径是 ~/.ollama/models。
最佳“全才”:首选 Qwen2.5:72B
极度推理需求:首选 DeepSeek-R1:70B
希望速度更快:可选 Qwen2.5:32B 或 Qwen3:30b-a3b
代码/数学偏好:可选 Qwen2.5-Coder:32B 或 Phi-4:14B。
综合强手:Llama 3.3:70B 也是另一个强劲的对手。
常用命令
安装 anythingLLM
AnythingLLM 是一个全方位AI应用程序。可以构建本地知识库,支持多用户。AnythingLLM 支持多种文档类型(PDF、TXT、DOCX等),具有对话和查询两种聊天模式。支持多种 LLM、嵌入模型和向量数据库。
AnythingLLM安装有很多方式,一是到官方网站(Download AnythingLLM for Desktop)下载桌面版,然后双击即可: https://anythingllm.com/
但是,与Docker版本相比,Desktop版本的功能要少很多,所以推荐安装Docker版
首先下拉一个镜像:
docker pull mintplexlabs/anythingllm
按照官方说明,输入下列命令:
# Run this in powershell terminal
$env:STORAGE_LOCATION="$HOME\Documents\anythingllm"; `
If(!(Test-Path $env:STORAGE_LOCATION)) {New-Item $env:STORAGE_LOCATION -ItemType Directory}; `
If(!(Test-Path "$env:STORAGE_LOCATION\.env")) {New-Item "$env:STORAGE_LOCATION\.env" -ItemType File}; `
docker run -d -p 3001:3001 `
--cap-add SYS_ADMIN `
-v "$env:STORAGE_LOCATION`:/app/server/storage" `
-v "$env:STORAGE_LOCATION\.env:/app/server/.env" `
-e STORAGE_DIR="/app/server/storage" `
mintplexlabs/anythingllm;
但是由于地域限制,官方拉取的过程中会出现无法拉取的问题,因此推荐以下安装方式。
docker 中部署的方法
配置 Docker 镜像加速器(中国大陆用户必选)
# 创建或修改配置文件
sudo tee /etc/docker/daemon.json <<-'EOF'
{
  "registry-mirrors": [
    "https://docker.mirrors.ustc.edu.cn",
    "https://hub-mirror.c.163.com",
    "https://registry.cn-hangzhou.aliyuncs.com"
  ]
}
EOF
重新加载docker
# 重启 Docker 服务使配置生效
sudo systemctl daemon-reload
sudo systemctl restart docker
使用 GitHub Container Registry:
docker pull ghcr.io/mintplex-labs/anything-llm:latest
启动已停止运行的容器
查看所有的容器命令如下:
docker ps -a
输出结果如下:
CONTAINER ID   IMAGE                                COMMAND                  CREATED        STATUS                    PORTS                                       NAMES
c9716acb51ab   ghcr.io/mintplex-labs/anything-llm   "/bin/bash /usr/loca…"   41 hours ago   Up 14 minutes (healthy)   0.0.0.0:3001->3001/tcp, :::3001->3001/tcp   compassionate_bose
使用 docker start 启动一个已停止的容器:
docker start c9716acb51ab
Mount the storage locally and run AnythingLLM in Docker
export STORAGE_LOCATION=$HOME/anythingllm &&
mkdir -p $STORAGE_LOCATION &&
touch "$STORAGE_LOCATION/.env" &&
sudo docker run -d -p 3001:3001
--cap-add SYS_ADMIN
-v ${STORAGE_LOCATION}:/app/server/storage
-v ${STORAGE_LOCATION}/.env:/app/server/.env
-e STORAGE_DIR="/app/server/storage" ghcr.io/mintplex-labs/anything-llm
Go to http://localhost:3001 and you are now using AnythingLLM! All your data and progress will persist between container rebuilds or pulls from Docker Hub.
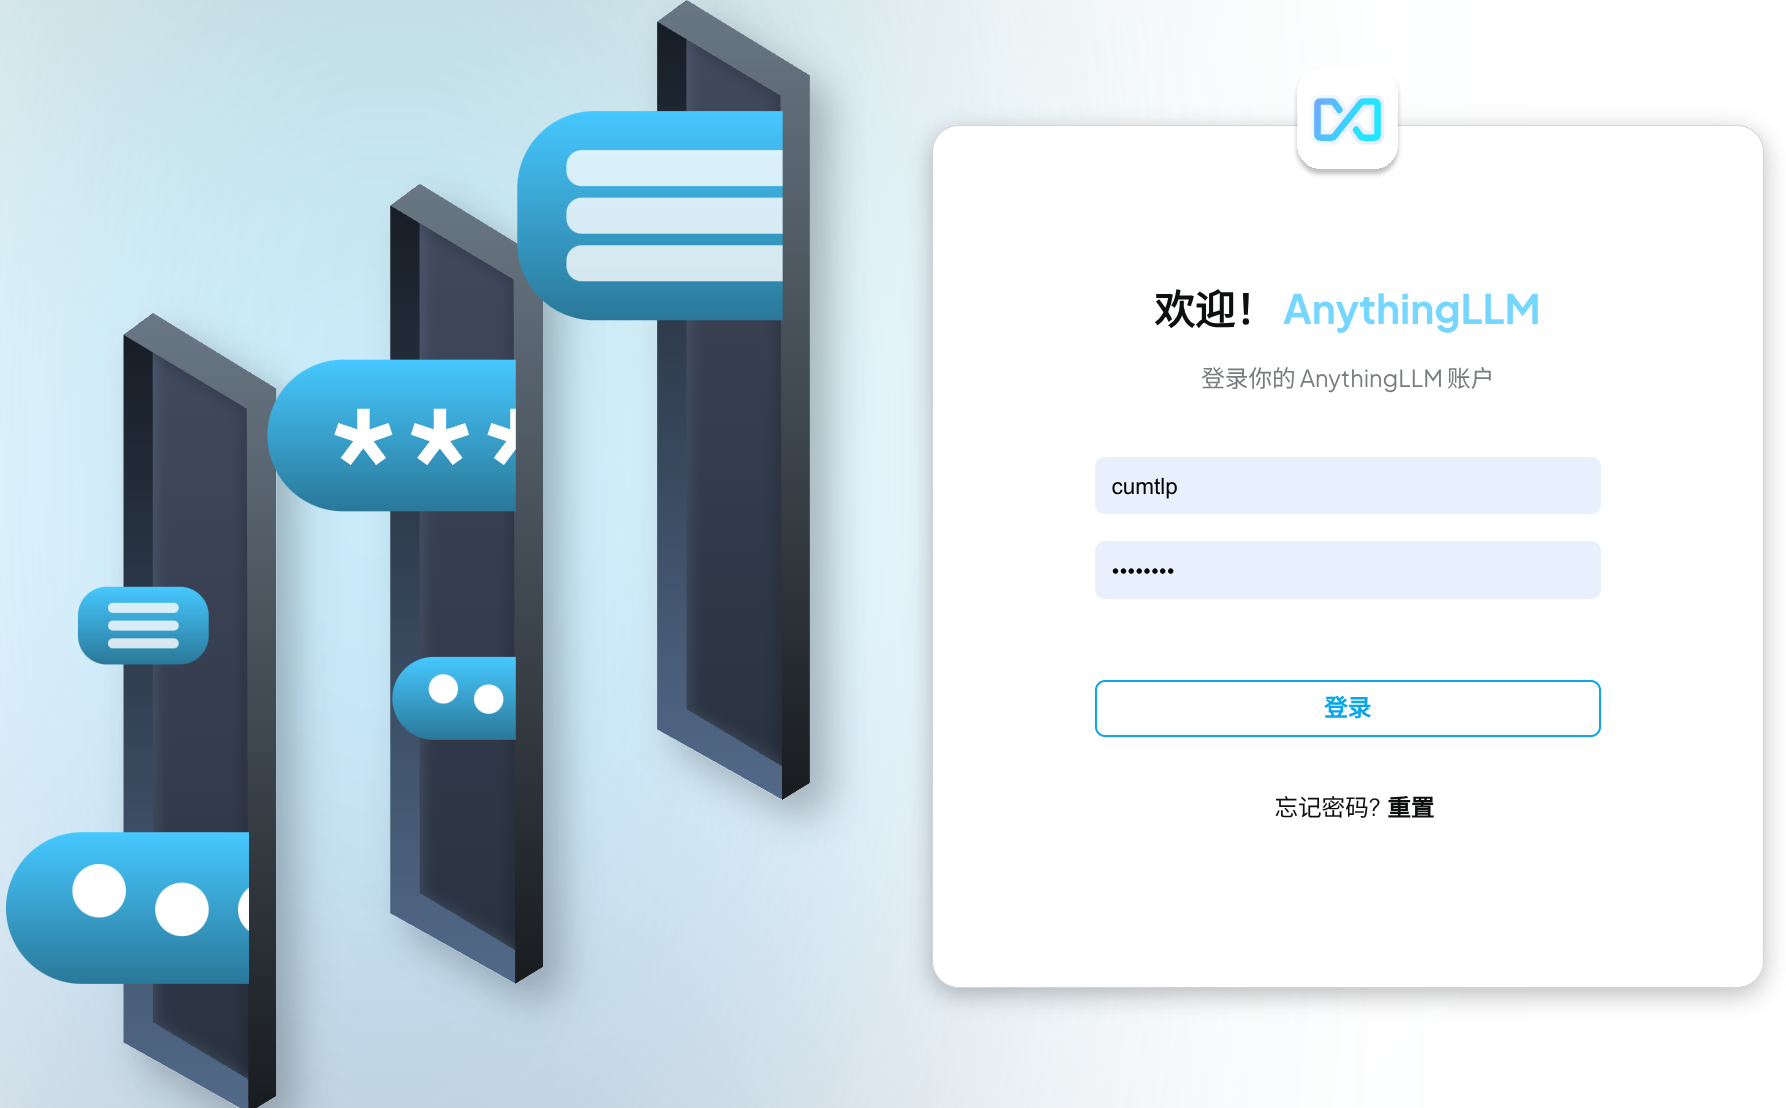
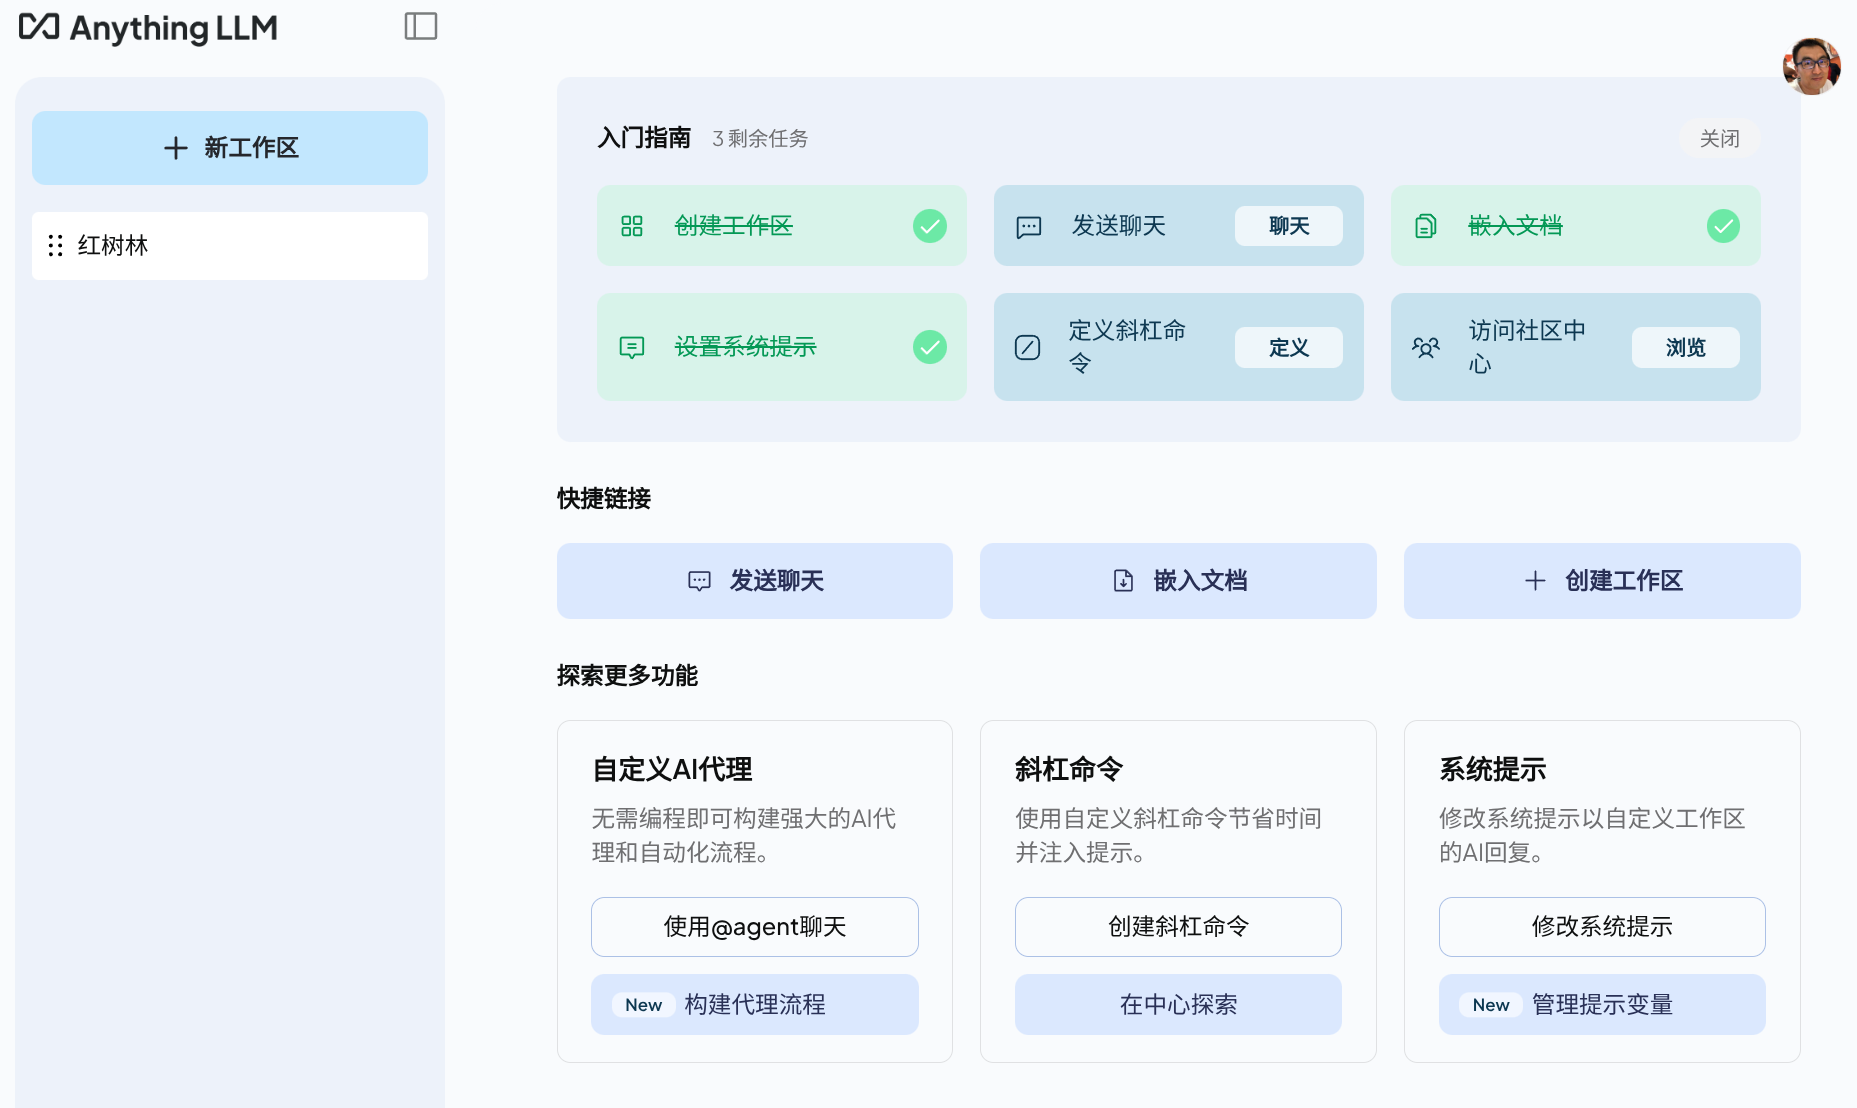
配置 anythingllm
LLM首选项
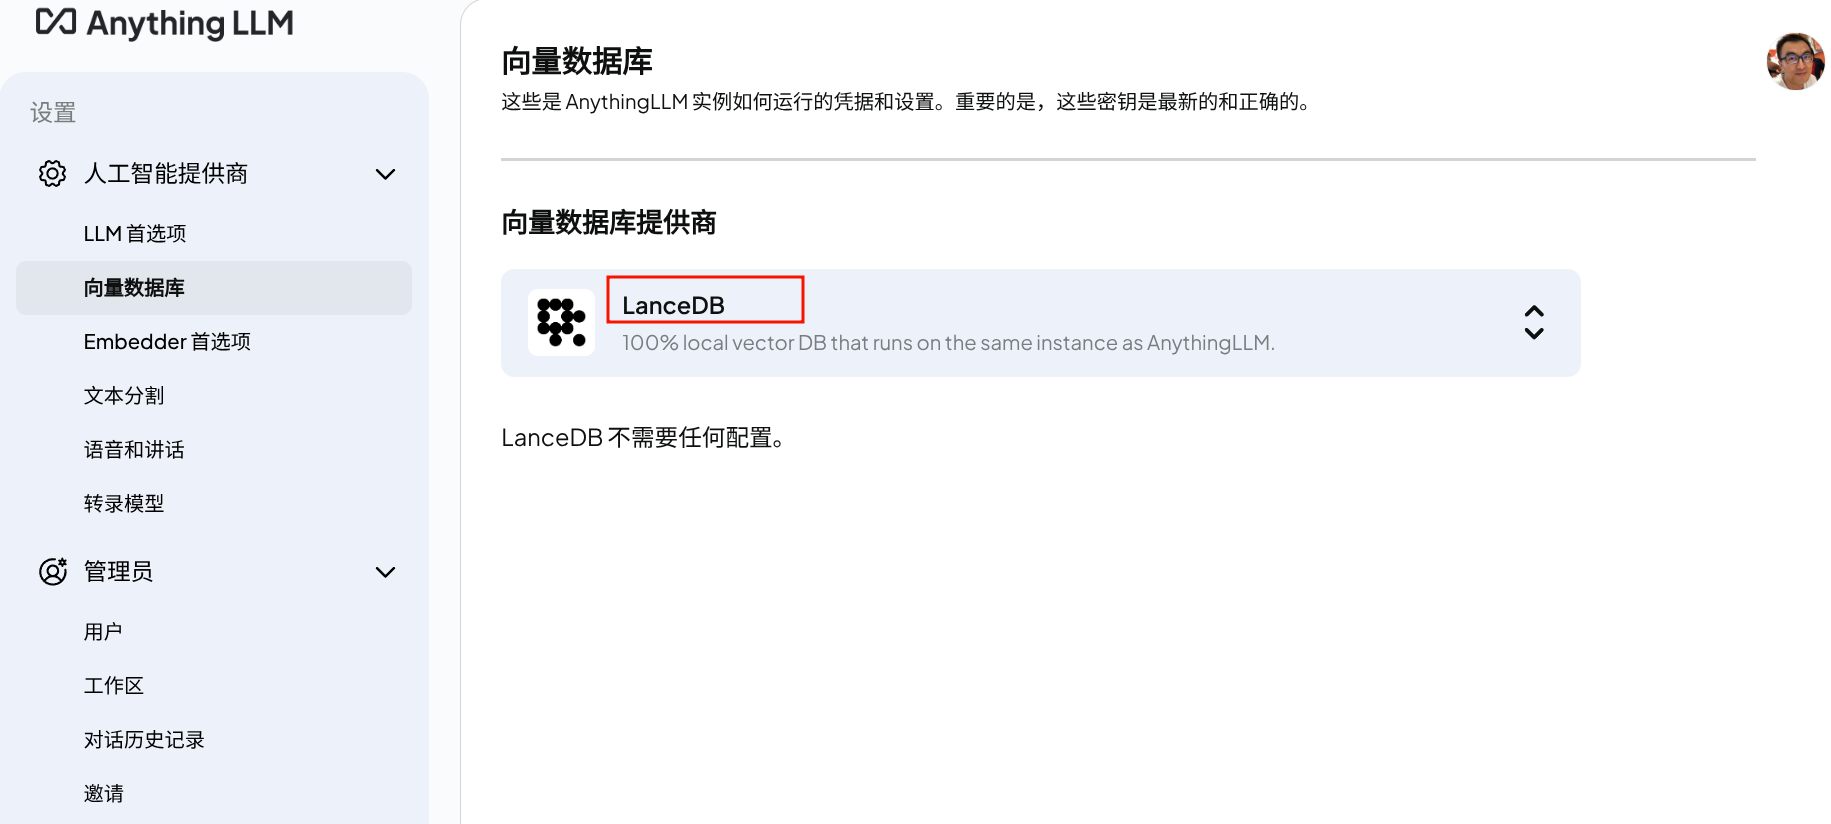
向量数据库
选择 LanceDB,这也是 anyghingllm 默认的
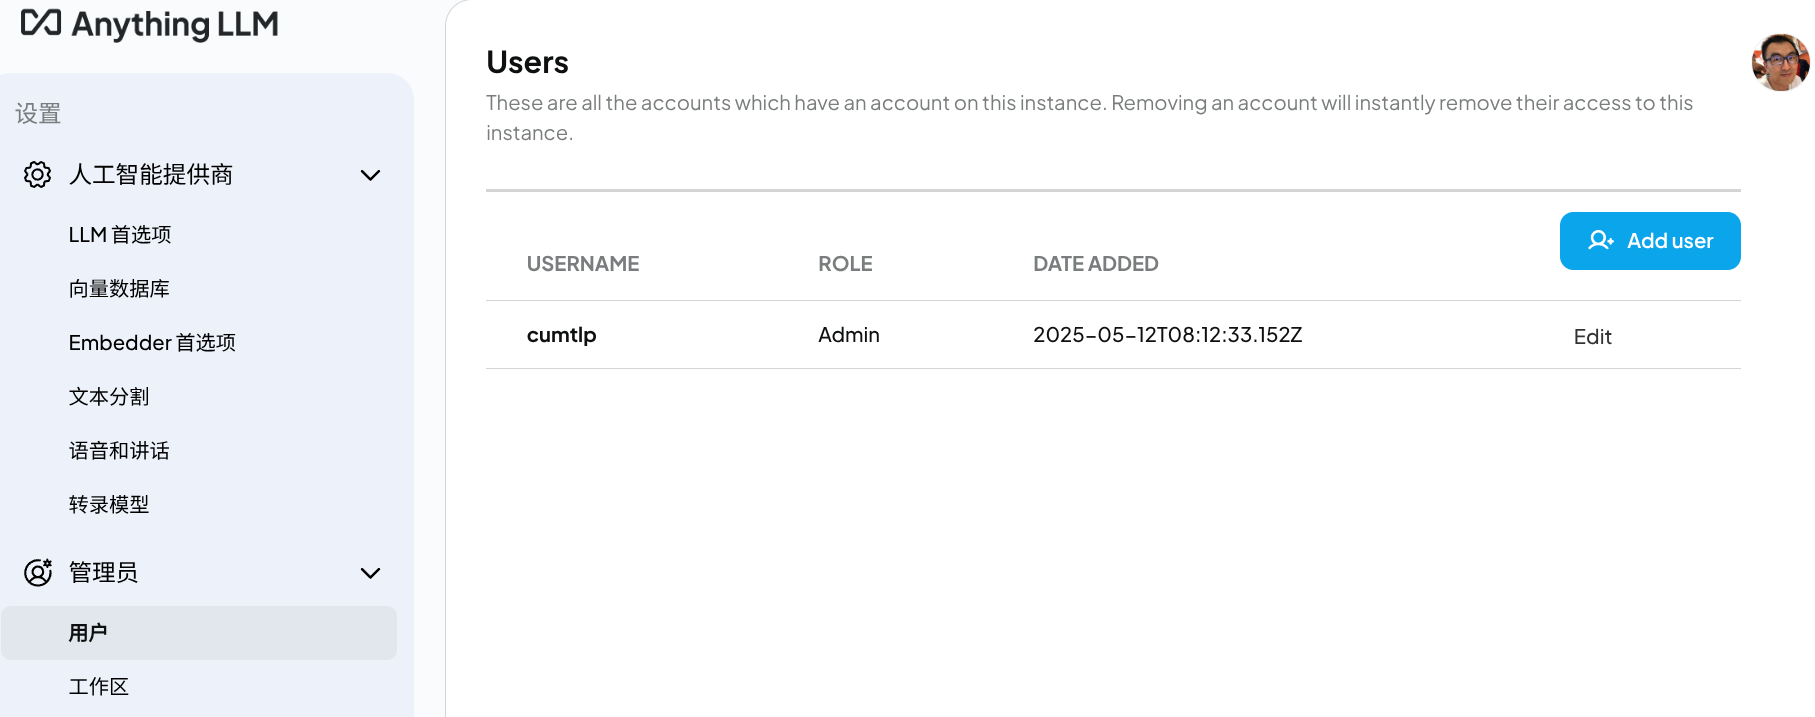
用户设置
首先设置默认用户,也是管理员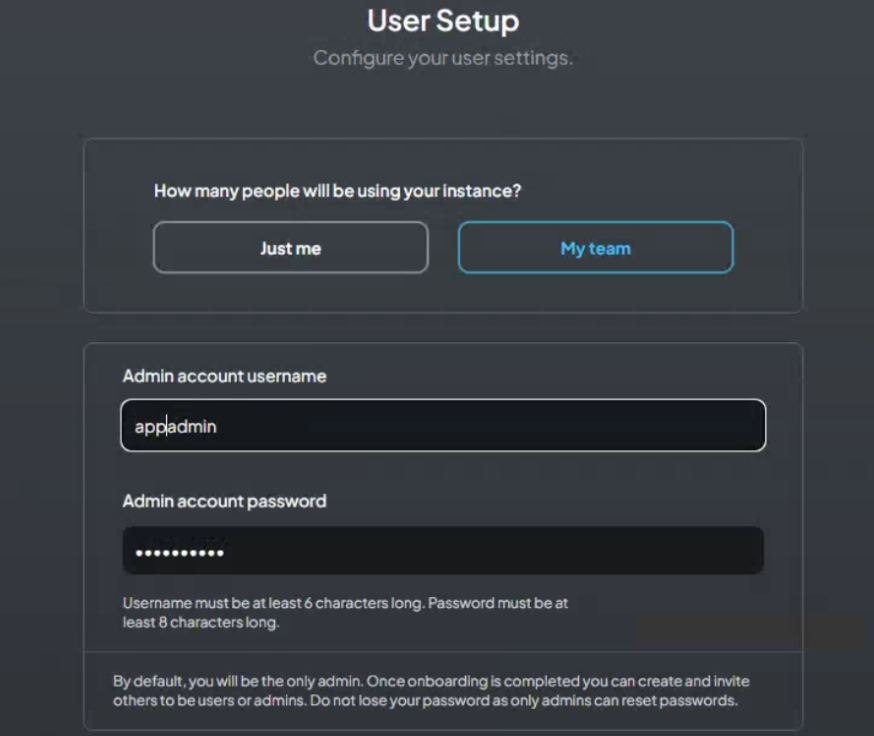
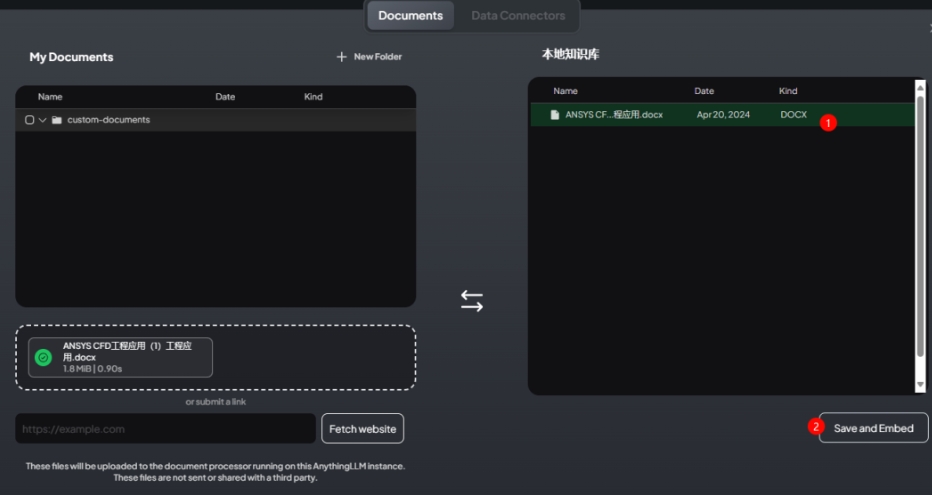
为本地工作区添加文件
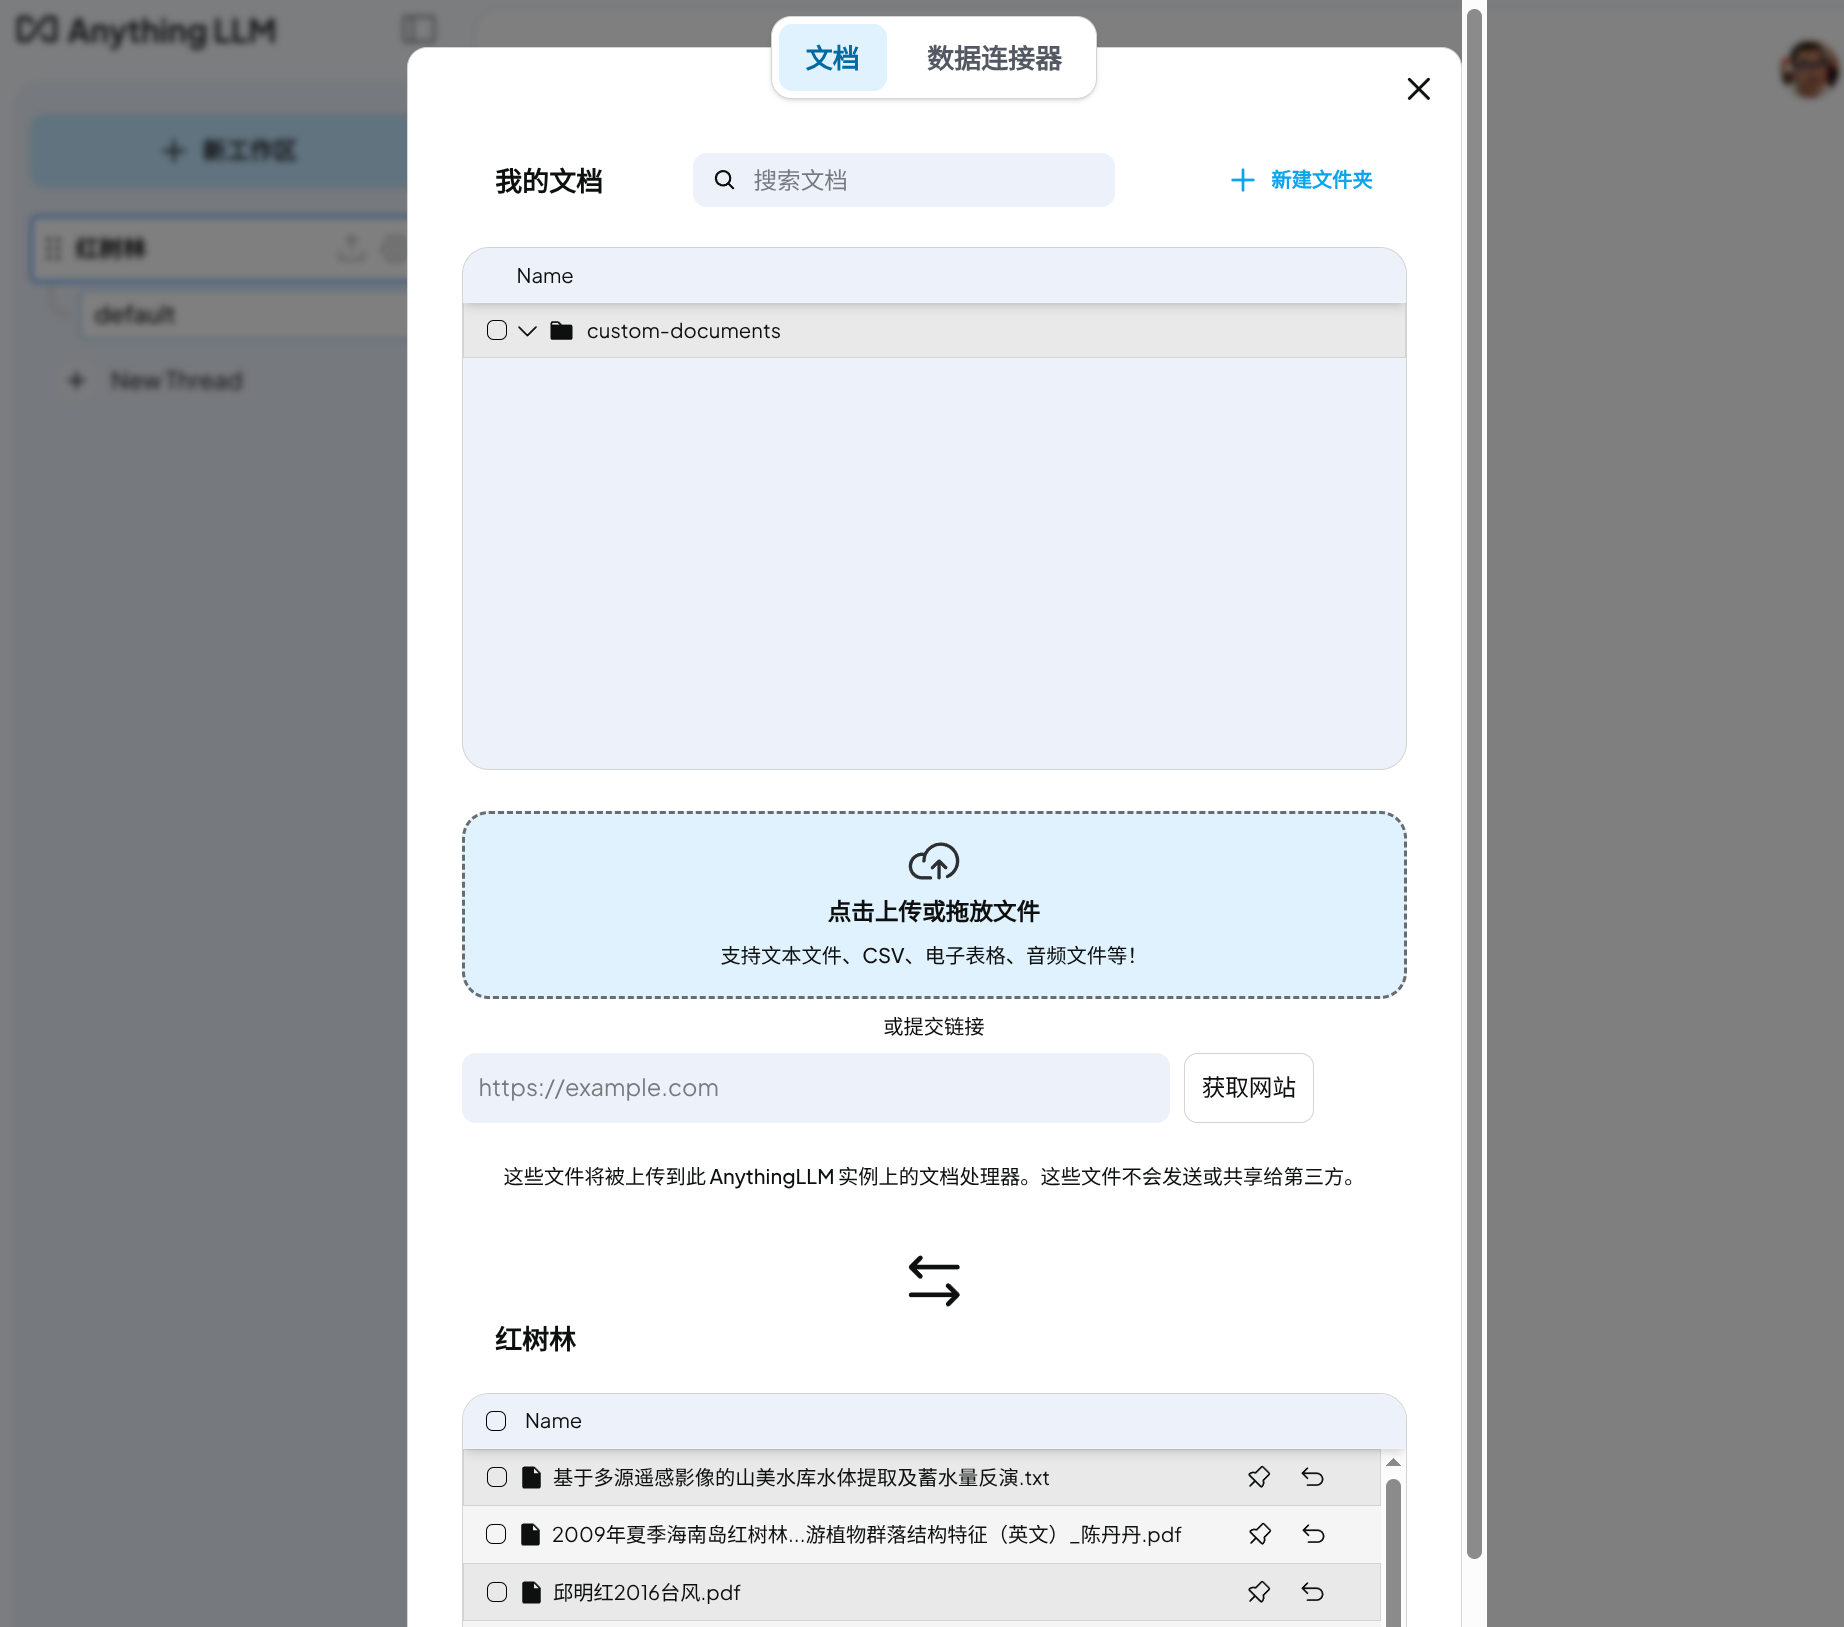
上传文档让模型训练
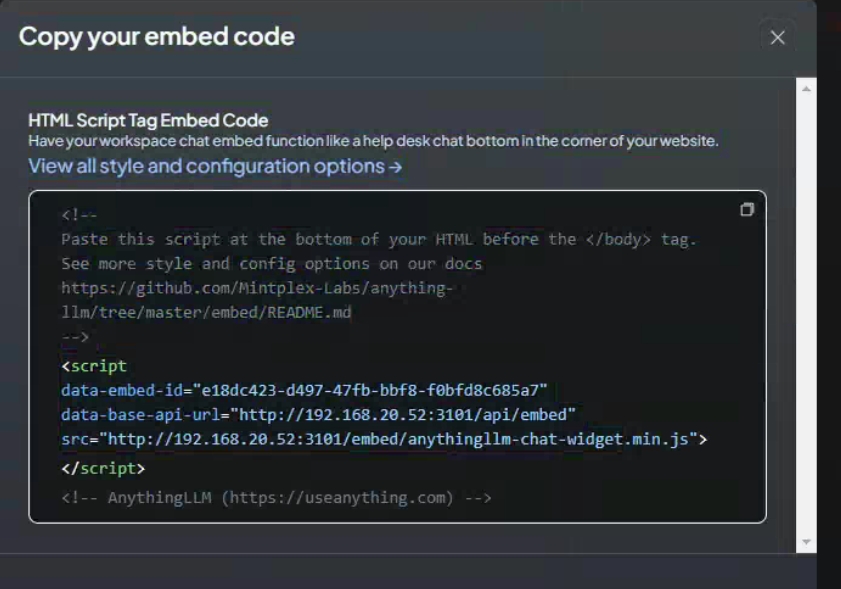
集成 google 搜索
可以集成google搜索

集成到内部OA系统
还可以集成到内部OA系统里去
设置完成
参考来源:
LlamaIndex + Qdrant + FastAPI
👉 LlamaIndex + Qdrant + FastAPI
👉 支持 文档入库 + 检索问答
👉 可直接被 Cherry Studio 作为 API 前端调用
- ✅ 最小可运行(MVP)
- ✅ 科研友好(metadata + 引用)
- ✅ 后续可扩展(不是玩具)
整体目录结构
rag_server/
├─ app.py                 # FastAPI 主入口
├─ ingest.py              # 文档入库脚本
├─ requirements.txt
├─ data/
│  └─ sample.pdf          # 你的论文 / 文档
└─ qdrant_data/            # 向量库存储目录
环境准备
1️⃣ 安装依赖
requirements.txt
fastapi
uvicorn
llama-index
llama-index-vector-stores-qdrant
llama-index-embeddings-huggingface
qdrant-client
pypdf
安装:
pip install -r requirements.txt
2️⃣ (可选)准备 embedding 模型
默认我用 bge-small-zh-v1.5(CPU 也能跑)
第一次会自动下载。
如果你是 集群 / 离线环境 / 无外网节点,那需要本地模型。
1️⃣ 安装 git-lfs
# Conda / 普通 Linux
conda install -c conda-forge git-lfs
# 或
sudo yum install git-lfs
sudo apt install git-lfs
2️⃣ 初始化 git-lfs(非常关键)
git lfs install
3️⃣ 重新 clone 模型(必须重新)
git clone https://huggingface.co/BAAI/bge-base-zh
cd bge-base-zh
git lfs pull
4️⃣ 验证权重是不是“真的”
ls -lh
你应该看到类似:
pytorch_model.bin     420M
model.safetensors    410M
❌ 如果只有几十 KB,说明还是假的
5️⃣ 再在 ingest.py 里用本地路径
Settings.embed_model = HuggingFaceEmbedding(
    model_name="~/models/bge-base-zh",
    device="cpu"   # 没 GPU 就用 cpu
)
文档入库(ingest.py)
👉 这是最重要的一步:
- 文档 → chunk
- 加 metadata
- 写入 Qdrant
# ingest.py
from llama_index.core import SimpleDirectoryReader, VectorStoreIndex
from llama_index.vector_stores.qdrant import QdrantVectorStore
from llama_index.embeddings.huggingface import HuggingFaceEmbedding
from llama_index.core import Settings
import qdrant_client

# ---------- 配置 ----------
DATA_DIR = "data"
COLLECTION_NAME = "papers"

# embedding 模型
Settings.embed_model = HuggingFaceEmbedding(
    model_name="BAAI/bge-small-zh-v1.5"
)

# Qdrant 本地存储
client = qdrant_client.QdrantClient(
    path="qdrant_data"
)

vector_store = QdrantVectorStore(
    client=client,
    collection_name=COLLECTION_NAME
)

# ---------- 读取文档 ----------
documents = SimpleDirectoryReader(
    DATA_DIR,
    recursive=True,
    file_metadata=lambda x: {
        "source": x,
        "doc_type": "paper"
    }
).load_data()

# ---------- 建索引 ----------
index = VectorStoreIndex.from_documents(
    documents,
    vector_store=vector_store
)

print("✅ 文档已成功入库")
运行:
python ingest.py
FastAPI 问答服务(app.py)
👉 Cherry Studio 直接连这个接口
# app.py
from fastapi import FastAPI
from pydantic import BaseModel

from llama_index.core import VectorStoreIndex, Settings
from llama_index.vector_stores.qdrant import QdrantVectorStore
from llama_index.embeddings.huggingface import HuggingFaceEmbedding

import qdrant_client

# ---------- 配置 ----------
COLLECTION_NAME = "papers"

Settings.embed_model = HuggingFaceEmbedding(
    model_name="BAAI/bge-small-zh-v1.5"
)

client = qdrant_client.QdrantClient(
    path="qdrant_data"
)

vector_store = QdrantVectorStore(
    client=client,
    collection_name=COLLECTION_NAME
)

index = VectorStoreIndex.from_vector_store(vector_store)
query_engine = index.as_query_engine(
    similarity_top_k=5
)

# ---------- FastAPI ----------
app = FastAPI(title="科研级 RAG API")

class QueryRequest(BaseModel):
    question: str

@app.post("/chat")
def chat(req: QueryRequest):
    response = query_engine.query(req.question)

    citations = []
    for node in response.source_nodes:
        citations.append({
            "source": node.metadata.get("source"),
            "score": round(node.score, 3),
            "text": node.text[:200]
        })

    return {
        "answer": str(response),
        "citations": citations
    }
启动服务:
uvicorn app:app --reload --port 8000
测试一下(浏览器 / curl)
curl -X POST http://localhost:8000/chat \
  -H "Content-Type: application/json" \
  -d '{"question": "本文的研究目标是什么?"}'
返回示例:
{
  "answer": "本文主要研究……",
  "citations": [
    {
      "source": "data/sample.pdf",
      "score": 0.84,
      "text": "In this study, we investigate..."
    }
  ]
}
Cherry Studio 如何接入(关键)
在 Cherry Studio → 模型 → 自定义 API
URL:
http://localhost:8000/chatMethod:
POSTBody:
{
  "question": "{{prompt}}"
}
系统 Prompt(强烈建议):
你是科研助理,必须严格基于返回的文献片段回答,
如无相关文献,请明确说明“知识库中未检索到依据”。
✅ 到这里,你已经是:
Cherry Studio = 前端
LlamaIndex + Qdrant = 科研级大脑
docker一键部署
「LlamaIndex + Qdrant + FastAPI」的一键 Docker 化方案,目标是:
✅ 零 Python 环境折腾
✅ 一条命令启动科研级 RAG 后端
✅ Cherry Studio 直接可连
✅ 可长期运行 / 可迁移 / 可复现
Docker 化后的整体结构
rag_server/
├─ app.py
├─ ingest.py
├─ requirements.txt
├─ Dockerfile
├─ docker-compose.yml
├─ data/
│  └─ sample.pdf
├─ qdrant_data/      # 向量库(持久化)
Dockerfile(核心)
👉 一个镜像同时支持 入库 + API 服务
# Dockerfile
FROM python:3.10-slim

WORKDIR /app

# 基础依赖
RUN apt-get update && apt-get install -y \
    build-essential \
    && rm -rf /var/lib/apt/lists/*

# Python 依赖
COPY requirements.txt .
RUN pip install --no-cache-dir -r requirements.txt

# 代码
COPY . .

# 默认端口
EXPOSE 8000

# 启动 FastAPI
CMD ["uvicorn", "app:app", "--host", "0.0.0.0", "--port", "8000"]
docker-compose.yml(强烈推荐)
👉 这个是科研用户一定要用的版本
version: "3.9"

services:
  rag:
    build: .
    container_name: rag_server
    ports:
      - "8000:8000"
    volumes:
      - ./data:/app/data
      - ./qdrant_data:/app/qdrant_data
    restart: unless-stopped
📌 说明:
| 目录 | 作用 |
|---|---|
data/ |
你的论文 / 文献 |
qdrant_data/ |
向量库(非常重要) |
重要修改:让代码“容器友好”
1️⃣ ingest.py(无需改逻辑,只确认路径)
DATA_DIR = "data"
Qdrant:
client = qdrant_client.QdrantClient(
    path="qdrant_data"
)
✔️ Docker volume 会自动映射
2️⃣ app.py(无需修改)
FastAPI 会自动监听 0.0.0.0
使用方式(标准科研流程)
① 第一次:构建镜像
docker compose build
② 文档入库(非常关键)
docker compose run --rm rag python ingest.py
你会看到:
✅ 文档已成功入库
📌 以后只要 data/ 有新文档,就再跑一次这条命令
③ 启动服务
docker compose up -d
访问:
http://localhost:8000/docs
你会看到 FastAPI 自动文档页面 🎉
Cherry Studio 接入(Docker 版)
完全一样:
URL:
http://localhost:8000/chatMethod:POST
Body:
{
  "question": "{{prompt}}"
}
📌 Docker 不影响 Cherry Studio 使用
科研级 Docker 化的关键优势(你会马上体会)
✅ 1. 可复现(论文 & 项目神器)
- 同一套镜像
- 同一套模型
- 同一套向量库
👉 换机器 = 拷贝文件夹 + docker compose up
✅ 2. 知识资产安全
- 文献原文:
data/ - 向量资产:
qdrant_data/
👉 不依赖云服务
✅ 3. 可直接升级成服务器版本
scp -r rag_server user@server:/opt/
ssh server
docker compose up -d
Cherry Studio → 服务器 IP 即可
win-docker
整体架构
┌──────────────────────┐
│  Open-WebUI (UI)     │  ← 你只和它交互
│  http://localhost:3000
└─────────┬────────────┘
          │ REST
┌─────────▼────────────┐
│  Ollama (LLM)        │  ← Qwen / LLaMA / Yi
│  http://localhost:11434
└─────────┬────────────┘
          │ Embedding
┌─────────▼────────────┐
│  Qdrant (Vector DB)  │  ← 学术级向量检索
│  http://localhost:6333
└──────────────────────┘
目录最终结构
open-webui-rag/
├─ docker-compose.yml
├─ data/
│  ├─ ollama/
│  ├─ qdrant/
│  └─ open-webui/
启动整套系统
docker compose up -d
关闭整套系统
docker compose down
确认服务是否正常
docker ps
基础访问
http://localhost:3000
下载指定大模型(llm)
docker exec -it ollama ollama pull qwen2.5:7b
推荐 Embedding 模型(中文科研)
docker exec -it ollama ollama pull bge-small-zh-v1.5
测试
docker inspect ollama | findstr -i nvidia
docker exec -it ollama nvidia-smi
查看模型是否被自动unload
docker exec -it ollama ollama ps
当模型常驻后,手动释放模型
docker exec -it ollama ollama stop qwen2.5:3b # 手动释放
docker exec -it ollama ollama run qwen2.5:7b # 手动点火
或者(最干净)
docker restart ollama
# // or
docker compose restart ollama
- 纯对话
用 50 字解释什么是XX - 强制 RAG 问题
根据我上传的论文,总结作者在xx方面的研究
你 → 对话框
   → 知识库(PDF chunk)
   → Qdrant 向量召回
   → Ollama 基于论文内容回答
手动启动模型
docker exec -it ollama ollama run qwen2.5:3b # 手动点火
验证已成功的点
Docker 三个容器全部正常启动
ollama   Up
qdrant  Up
open-webui Up
Ollama 容器里可以跑
nvidia-smiNVIDIA RTX A4000👉 说明 GPU 已正确透传进 Ollama 容器
模型已成功下载
ollama pull qwen2.5:3b
success
你现在看到的是:
docker exec -it ollama ollama ps
NAME    ID    SIZE    PROCESSOR    CONTEXT    UNTIL
这代表:
当前没有任何模型“正在内存中运行”
Ollama 的机制是:
pull→ 只是下载模型ps→ 只显示已加载到内存(占显存)的模型- 模型只有在第一次被 run / 被调用时才会加载
👉 所以现在是一个干净、正确的初始状态
下一步:手动把模型“点火”(关键一步)
现在请你执行 这一条命令:
docker exec -it ollama ollama run qwen2.5:3b
你会看到:
>>>
或者先有几秒 loading,然后出现可输入提示符。
这个动作会发生三件事:
ollama ps会开始显示模型- 模型权重加载进
GPU显存 - Open-WebUI 里模型后面会出现 绿色圆点
1️⃣ 看 ollama ps
docker exec -it ollama ollama ps
你应该能看到类似:
NAME            PROCESSOR   SIZE    UNTIL
qwen2.5:3b     GPU         1.9GB   ∞
2️⃣ 看 GPU 显存
docker exec -it ollama nvidia-smi
你应该看到:
- 显存使用 ↑(比如 3–6 GB)
- GPU-Util 在提问时明显上升
3️⃣ 打开 Open-WebUI(浏览器)
地址:
http://localhost:3000Models 列表里:
qwen2.5:3b后面应该有 🟢 绿点
保持模型持久运行
OLLAMA_KEEP_ALIVE: "-1"
👉 模型不会自动卸载
👉 绿点会一直存在
👉 不会再出现“几分钟不用就变慢”的问题
如果之后你想切换模型,如何释放显存?
停掉当前模型(推荐)
docker exec -it ollama ollama stop qwen2.5:3b
或全部清空
docker exec -it ollama ollama stop --all
你现在的系统状态是:
- ✅ GPU Ollama(稳定)
- ✅ Open-WebUI
- ✅ Qdrant 向量库
- ✅ 中文 Embedding
- ✅ 模型常驻显存